After harvesting multiple weeks or months of effort in the garden, you don’t want your grains and foods to finish off in a few days.
There, you need preservation methods to store grains long-term at home for later use. This helps you avoid food crises, save money, and be flexible about gardening and producing crops.
So, if you don’t know how you can start with grain storage, here is the guide for you with the best possible answer!
Best Grains for Long-Term Storage
You are free to store the grains available at your home, but you may need to know a few grain types with a generous shelf life to store for the long term.
We can divide grains into soft and hard, depending on the variety.
Soft grains such as oats, oat Groats, rye, and quinoa have a soft outer shell that is unable to protect the inner seed well. However, if stored properly, they can last for 8 years.
On the other hand, hard grains have a robust shell that protects the germ of the seed. Buckwheat, flax, corn, mullet, kamut, triticale, and wheat are in this category.
These grains have a longer shelf life between 10 and 12 years but can be expanded around 25-30 years.
Always store whole grains for the long term at home.
Besides grains, you can also store legumes and pulses such as lentils, chickpeas, and beans.
The best grains for long-term storage include the following.
| Grains | Shelf Life (Not Opened) |
| Wheat | 30 years |
| Rolled Oats | 30 years |
| White Rice | 30 years |
| Pearled Barley | 10 years |
| Corn or Cornmeal | 5 years |
Traditional Methods Vs. Advanced Methods of Storing Grains
Farmers stored the grains in gourds, palmyra leaf bins, cribs, straw bins, earthen or bamboo bins, earthen pot-piles, and underground pits.
They also used ash, neem leaves, diatomitzed earth, camphor and other natural preservatives.
When produce was large in quantity, they started storing the foods in mud or bamboo houses, silos, mud rhombus, and obeh.
These traditional methods are cheap and eco-friendly and help increase the shelf life of the stored commodities.
If we make a few modifications to the traditional methods, they will still be relevant, whether for a homestead or storing grains in agriculture.
In the modern world, we have airtight containers such as food-grade buckets, glass jars, and vacuum-sealing for long-term grain storage.
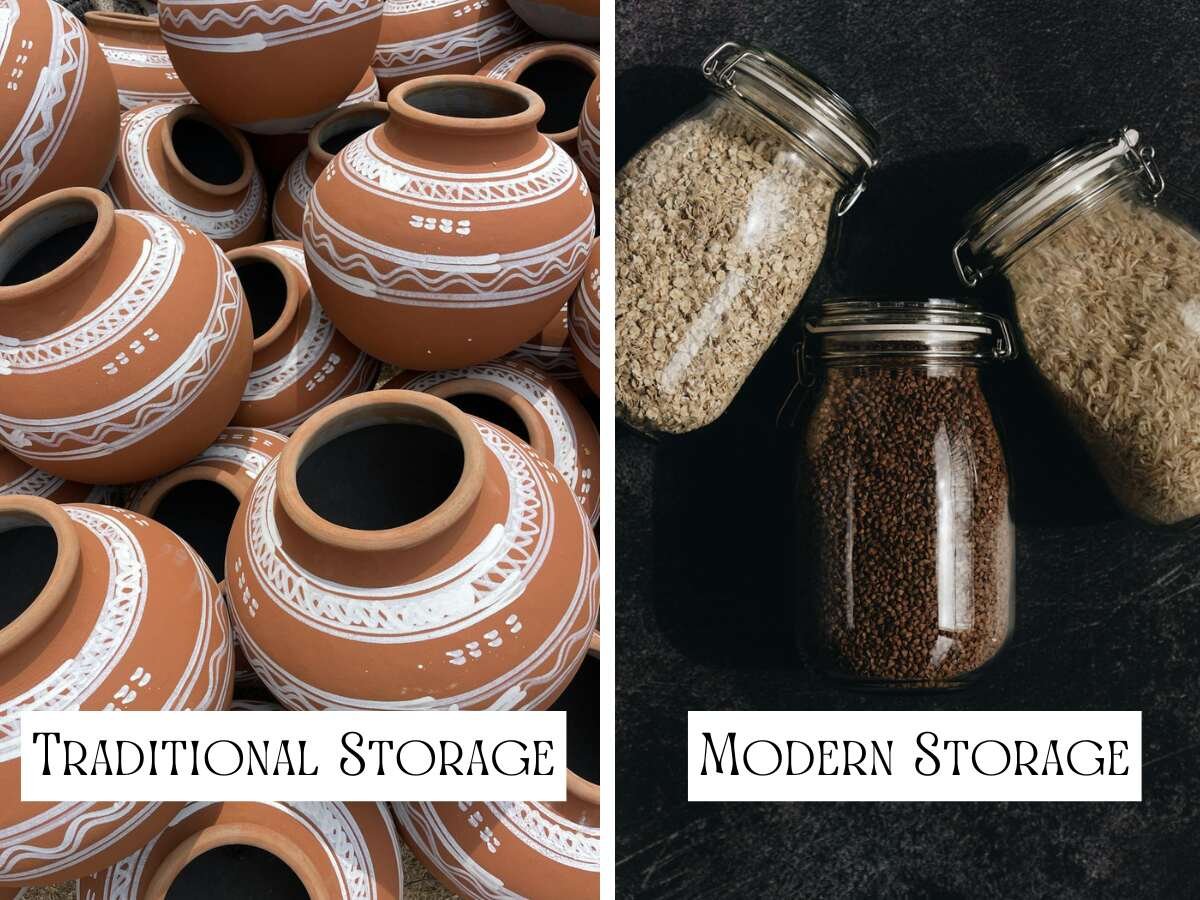
Mylar bags with oxygen absorbers are a technology-oriented storage method that helps preserve grains for a long time.
Besides, you can also store the grains and foods in the fridge. For this, place the grains in airtight, moisture-free bags and containers.
You need to release as much air as possible when sealing.
Only open the refrigerator when necessary to maintain the temperature. This way, you can store amaranth, buckwheat groat, pearl barley, farro, hulled millet, and rolled oats for three months to one year.
Step-by-Step Guide to Storing Grains
Step 1: Inspect and clean the grains to remove debris
First, select the harvested grains that store well and have low moisture content and hard shells.
Choose whole grain that has intact, unprocessed kernels covered by bran. On the other hand, a flour has been grind to a finely ground powder which is more susceptible to oxidation and moisture.
So, put the whole grain in a grain cleaner with different mesh sizes to isolate and remove unwanted debris such as chaff, earth, weed seeds, stones, and broken kernels.
After cleaning the grain, start a grain dryer, ensuring optimal quality and preventing spoilage. This helps grain dry to the proper moisture level for storage.
Step 2: Choose an appropriate container for storage
Though you can store the grain on a clean floor directly, it may not be helpful in managing it for other purposes, including condition control, labeling, and deterring pests.
So, you need to invest in storage containers that are airtight, moisture-proof, and made from a long-lasting material.
Food-grade containers are eco-friendly alternatives to everyday items. They are heat resistant and don’t leak toxins or chemicals into food. Here are some types of containers for different purposes.
Airtight Containers: Glass jars, plastic buckets, and mylar bags
Vacuum-Sealed Bags: For preserving freshness
Metal Containers: Protecting grains from rodents
5-gallon food storage bags and containers are good size for grain storage.

After selecting the containers, don’t forget to clean them, sweeping and vacuuming all surfaces, such as floors, ceilings, walls, and crevices.
Remove any old grain left behind.
You can use specialized bin-cleaning tools for narrow or hard-to-reach areas. After that, you need to fill the container with the available grains without spoiling.
Step 3: Add oxygen absorbers or silica gel packets
If air or oxygen is present in the grain container or bag, some issues, such as spoilage, discoloration, and the growth of bacteria and fungi, appear to destroy the grain.
So, you need to install oxygen absorbers or silica gel packets in the container.
Oxygen absorbers come in various forms, such as sachets and self-adhesive patches. Get some based on the available options.
Step 4: Seal the container tightly
Practice with the vacuum or heat sealer on dummy bags before trying the real thing.
If you have a solid container, clean the rim and align the lid firmly. Then tighten the lid using your fingers until you hear the sound “pop” or feel resistance.
Step 5: Label with the type of grain and storage date
Take a piece of paper and write the name or type of the grain with the packaging or storage date.
Use permanent markers so that the surrounding environment cannot smear or rub the documentation. You can also use DIY labels or creative stickers.
In this digital age, I recommend attaching QR codes to storage bags and containers. This helps you easily access and manage the record.
Step 6: Store in a cool, dry, and dark place.
Heat, moisture, and light decrease grains’ shelf life. Therefore, you need to keep the temperature between 40 and 70 degrees Fahrenheit.

Also, avoid placing the grain near the window to prevent direct sunlight or near sources of heat or moisture.
As a root cellar requires cool and moisture to preserve food, you need to depend on a pantry for grain storage.
Tips for Successful Long-Term Grain Storage
Many farmers and homesteaders are concerned about managing the first harvest of grains until the next season if they have low produce.
So, proper storage methods help them keep their grains for years ranging from 7 to 12 years.
The shelf life of grains depends on the type, storage conditions, and climate. Here are some tips for extending grain shelf life.
Detering Pests: Regularly check for signs of spoilage or pests. Pests, including weevils, moths, and rodents, wreak havoc on the stored grains.
So, add bay or neem leaves in the container. Also, sprinkle natural repellents, including diatomaceous earth, around the container.

Besides, you can freeze grains at 0°F (-18°C) for 48 hours before storage.
Storage Area: Place the grains in a cool, dry, and dark area., Damp environments can destroy grains, allowing mold and bacteria, seed germination, insects, and pests.
Discard if grains show mold or an off smell. Don’t try to salvage them by removing the moldy parts.
Also, choose a place to store grains long-term, with good airflow at home. So, storing grains in a dedicated pantry is wise.
Controlling Temperature and Humidity: Use a freezer and refrigerator to control temperature and desiccants for humidity.
You need to keep refrigerated grain under a max internal temperature of around 40ºF. Maintain dry storage grains between 50-70ºF.
Also, don’t allow moisture levels more than 10%.
Container practice: Avoid using non-food-grade containers. Maintain proper labeling for dates and grain types using humidity-friendly products.
This helps you identify the new or old placeholder with records without opening lids first.
Usage: You need to rotate grains using the “first in, first out” method. This helps you ensure you serve the grain from the container stored earlier than opening the container that has been stored recently.
When taking out the stockpile, replace it with new or fresh grains as needed.
This way, you can get a fresh and nutritious supply of grain in need without breaking the chain.
Final Thoughts
Storing grains long-term not only helps you survive the scarcity of food but also helps you raise a garden.
The stored grains are viable for at least two years. This way, you can be self-sustainable during the crisis. In my experience, the older, the better.
I always store rice without removing the chaff.
And I can tell you that I find the taste of older rice to be better after processing than that of newly harvested grains.
Frequently Asked Questions (FAQs)
How long can grain be stored in silos?
Silos have several forms, including mud, thatch, metal, and plastic. Depending on the moisture content of grains, you can store them for the following duration.
9%-13% humidity: 8-11 months
Below 9% humidity: More than one year
However, you need not store the same grain for more than two years in the silos.
How do you preserve grains from insects?
You can easily preserve grains from insects in food-grade bags and containers. Also, place the storage container in a cool, dry, and dark place that is inaccessible to insects.
You can also use neem leaves, bay leaves, and diatomaceous earth to deter pests.
How can I store grains long-term in mylar bags at home?
Place mylar bag in a big container to prevent spoilage and fill it with grains.
Take one 2000 cc oxygen-absorbing pack. You can add 2-3 smaller-sized packs and press the bag with your hands to release the excess air.
Finally, seal the bag with a heat sealer.


Leave a Reply