I own a few bulkier compost bins with more structure, so I spread a thick layer of organic debris over everything when I’m satisfied with its consistency and results.
This allows me to manage my garden waste, chips, leaves, and kitchen scraps or household browns. It’s quite a structure, measuring 4.5 feet wide, 4 feet tall.
My livestock there would be red wigglers, which work faster and produce nice vermicompost.
Starting with Vermicomposting…
Vermicomposting is a process of composting things such as kitchen scraps through small worms and producing rich organic fertilizer for gardening.
Many hesitate to start because of the smell from the compost pile, which is especially true with hot composting.
Unlike cold composting, hot composting generates a high internal temperature, the leaching liquid and odor, which can disturb the surroundings.
But vermicomposting is different. You can start indoors in a small space, e.g., a 5-gallon bin.
My compost piles don’t smell, and I don’t bother to buy the stuff. Actually, I cover the pile with a thin layer of torn-up paper.
It takes less time to decompose things than a traditional compost system.
You only need some worms in the bin, and you need to feed them food scraps and other decomposable materials.
And the rest, the worms could do all.
Also, you wouldn’t need to worry about temperature or seasonal changes. The worms can adapt to the condition and work throughout the year.
But before you start, I want you to learn some advantages and disadvantages of vermicomposting.
To start vermicomposting, you don’t need to spend money on a worm factory or ranch. To be honest, I started it with a tote that had a lid that fit tightly.
But that tote would shelter around 5000 worms, which could actively eat, explore, multiply, and sleep.
I did two things that made it easier to raise worms, and I added one extra thing that not only kept my livestock alive but also healthy all the time.
Besides, I have also heard some stories of keepers buying worms that barely survived. You must know how to start vermicomposting and continue without any issues.
Best Worms for Vermicomposting
Red Wigglers (Best Choice)
Do you know Red Wigglers live in the upper layers of the pile, which makes them so great at composting?
5 inches long.
They are good, fast eaters and thrive in simple compost bins. You can expect them to consume half of their weight in a day.
These wigglers also don’t leave your bins every time it rains.
Also, they multiply quickly, and you can expect their numbers to double every 3 months. For this, you need to provide them with warm, humid conditions.
European Nightcrawlers
These are larger worms, with triple or quadruple the size of red wigglers. So, you can expect them to give the casting with ease.
European nightcrawlers burrow several feet below the surface to survive in the winter.
So, they are good for outdoor bins. Or they aerate the ground of lawns and gardens. You can also use these worms as bait when fishing.
As a beginner, you can keep a mix of red wigglers and European nightcrawlers in your bins.
Besides, other worms used for vermicomposting include epigeic worms, blue worms, African nightcrawlers, and Alabama or Georgia Jumpers.
But I want you to avoid raising garden earthworms, which need mineral soil and deep tunnels to survive.
These deep-burrowing worms cannot do well in the surface compost layer.
How to Set Up a Worm Bin
Step 1: Choose a Worm Bin
You can find several types of composters or worm bins on the market, but you need to get ones that don’t have antimicrobial properties.
Besides, the bins should have lids to protect the compost and worms from rain and birds. Make sure your bins have proper drainage holes at the bottom and some holes on the sides.
If you’re building a bin on your own, poke at least two rows of holes in the bottom half and the middle of the container.
Vermicomposting also needs enough room to accommodate the bedding so that all worms can move around easily.
I prefer a void space above the bedding for airflow, which can let bedding or worm castings accumulate.
The following types of worm bins you can choose.
- Plastic bins
- Wooden bins
- Stackable worm towers
- DIY worm bins
Step 2: Lay Moistened Bedding
After getting the bin, place it off the ground with long stakes. This helps airflow travel under the bin.
Then, you may want to lay about half of the bin with moistened bedding.
I suggest you fill it with stuff such as shredded newspaper, cardboard, coconut coir, or dry leaves.
Worms may hesitate to adapt to a new home if it’s made only of scratches. To help with this situation, you can add compost from existing bins that have been wormed for some time.
Also, add a handful of garden soil there to inoculate the bin worms and sand. This helps microorganisms use the sand in their gizzard to grind food.
Step 3: Add Worms
You can order worms online. I suggest you get 1000 worms for the new bins if you’re a beginner and need some experience working with them.
Remember, a small population takes longer to decompose food waste.
Anyway, you can drop the worms in the bin and help tuck them in their bedding. Just keep the bin under the light for the first time.
These bugs don’t like the light and hide themselves by tunnelling below the surface.
So, this helps prevent worms from escaping the bin.
Step 4: First Feeding
After they have settled for 24 hours, you can give them their first feed while they are under the bedding.
Start with a small amount of food. If you don’t have leafy or woody scraps and worm medium, your bin bedding would look like a billiards table.
This is because your worms work on the surface materials.
Once some of the worms are visible at the upper level, you can increase the feed intake, as they can eat and digest 50-100% of food waste per day.
Step 5: Cover the Compost Pile
The final step is to cover your compost pile to block the light and protect worms from predators. You can use damp newspaper or anything that can retain moisture and veil the light.
Also, you need to maintain an ideal temperature (55-80°F).
For this, you can store your worm bin indoors or keep it in the shade outdoors. Avoid the direct sun outside.
If possible, I suggest you place the composting bin in a cool, dark spot with minimal temperature change.
But that should not freeze or get excessively hot during the summer. I think basements and the place under the kitchen sink can be ideal locations for such a condition.
What to Feed Compost Worms
Do you know worms don’t eat until food starts breaking down?
You can help this process along by allowing your worms to eat the food more quickly.
For this purpose, I have a container in the freezer to collect things and put them in the food processor before feeding my worms.
Also, grind the eggshells to help your livestock digest faster.
Best Foods for Worms
Worms prefer plant-based food such as vegetables, fruits, grains, and beans. They eat peels, but they may take some time to digest them.
I have noticed them eating salad mixings well, but without onions and salad dressings.
Also, I have fed them melons, including rinds, watermelons, cantaloupes, and honeydew. Below are some of the best foods for vermicompost worms.
- Fruit scraps and peels
- Vegetable peels
- Coffee grounds
- Tea bags
- Crushed eggshells
- Shredded paper (without color applied)
Foods to Avoid
A few things that these worms don’t like much include cabbage, onions, and garlic. These are high in sulfur and stink when you open the bin for the first few days.
Anyway, don’t feed them these items in large amounts, but they should eat at least a small amount of anything plant- or animal-based.
But you need to avoid treated food or items that have been treated with pesticides. Make sure the feed is not acidic.
- Meat
- Dairy
- Fatty and fermented products
- Sawdust
- Oily foods
- Bleached or carbon paper
- Citrus in excess (tomatoes, melons)
- Salty foods
- Grass clippings from treated lawns
How Often to Feed Worms
Start with small amounts and then increase the intake, but don’t overfeed worms.
They can do well even on the food every few days. It is wise to feed them every 2 to 3 days.
So, you are free to feed your small animals once every couple of weeks if the conditions are not optimal.
If too much food piles up, the bin will stink. For instance, my 10-gallon tote can hold and absorb a quart of food waste each week or two.
Chopping Scraps for Faster Composting
Smaller pieces decompose more quickly, which helps the worms digest faster, too. So, you need to chop or grind the material before feeding it to the worms.
You can also freeze the food, and then thaw it to help it break down easily.
Maintaining the Perfect Worm Bin Environment
Moisture Levels
You should make bin bedding feel like a wrung-out sponge.
While some owners overpour gallons of water on their worms, others leave the bin dry. So, if the worm bin is too wet, it’s more likely to stink and have your worms get underwater.
Besides, worms get dehydrated, cannot breathe, and barely survive when the bin is too dry.
So, you need to monitor your bins regularly. The simple way to check the moisture level is to take a handful of bedding and squeeze it.
If it has a drop or two of water coming out, it’s optimal. More than a few drops of water show the bin is too wet.
And no water drips out means the bin is excessively dry.
Temperature Requirements
Do you know that worms slow down decomposition when the air temperature drops by 40 degrees Fahrenheit?
Also, they cannot survive temperatures below freezing or above 84 degrees Fahrenheit.
Remember, the ideal temperature ranges from 55 to 80 degrees Fahrenheit.
But you can fix the temperature imbalance by using bin blankets and insulation. You can also relocate the bin and use a moisture regulator indoors.
Airflow and Oxygen
Airflow determines the quality of the worm castings, as vermicomposting is an aerobic process.
This becomes especially important if you want to use the castings in your own garden or sell them.
So, you need to maintain airflow and oxygen in the bedding of the bin. I suggest you prevent the bedding from compacting.
Also, the larger the bin, the more open air it has.
Balancing Greens and Browns
Greens, including food scraps and grass clippings, are a nitrogen source and provide nutrients and moisture.
On the other hand, browns are the carbon source, such as brown or dry leaves, straw, and shredded paper. They provide energy and absorb the excess moisture.
Besides, they increase the pile’s porosity, allow airflow, and prevent compaction so worms can live.
So, you need to balance greens and browns in the bin. I suggest you mix the ingredients in a 1:1 or 3:1 ratio (greens and browns, gradually).
How to Harvest Worm Castings
It may take 2 to 6 months for worm castings to form, depending on bin size, food waste, worm population, and environmental conditions.
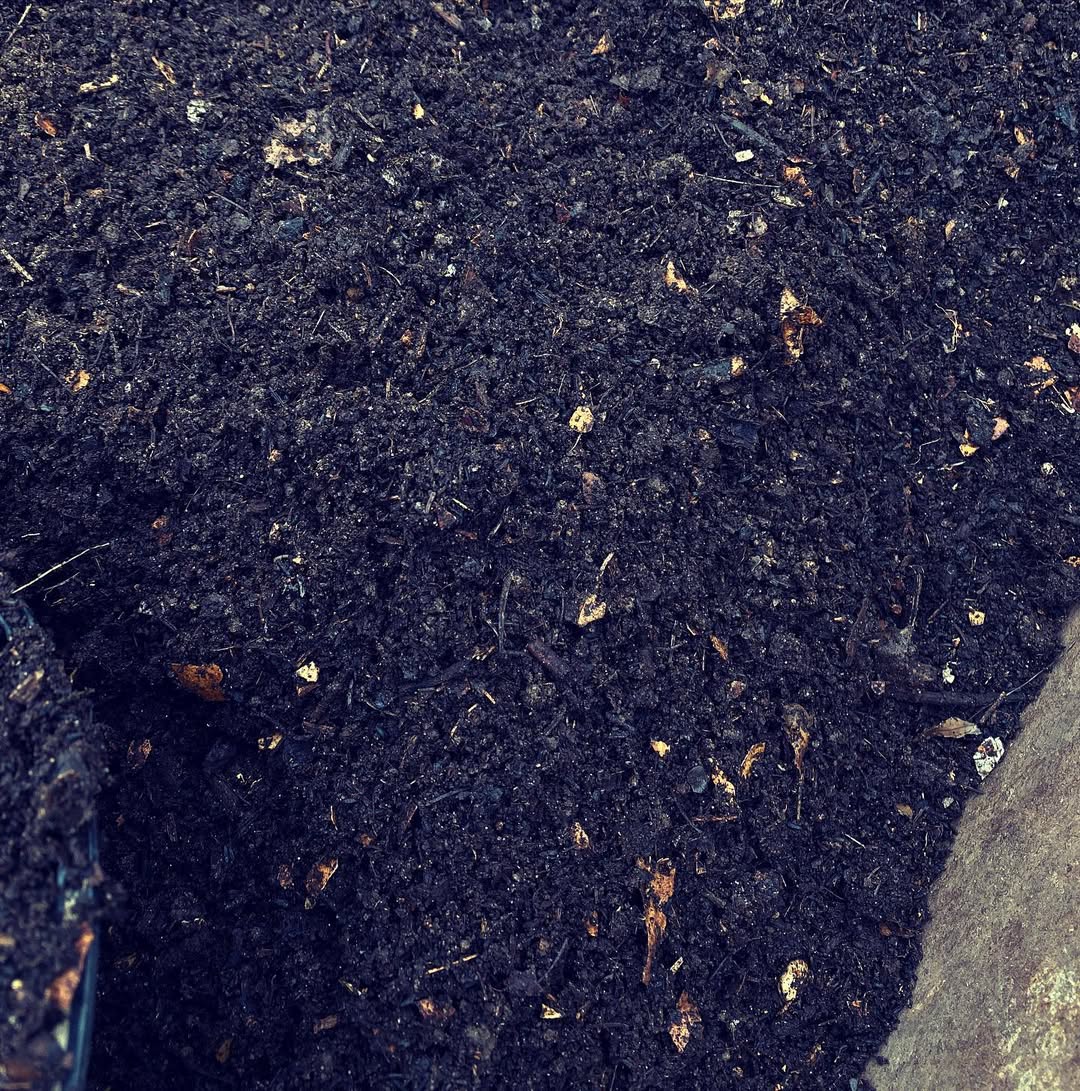
The finished worm casting is excreted as dark, almost black, crumbly compost. It should have an earthy smell and be free of visible scraps.
The simplest way to harvest worm castings is to scoop out the finished castings with a trowel and leave the unfinished there for worms to break down.
But you end up removing some worm population from the castings, so you may need to try the following methods to harvest the castings and save worms for new bins or for the rest of the bin compost.
1. Migration Method
Move food waste to one side to attract worms, so you can relocate them without force. This is effective for a new area or bin. You can do this in two ways.
- Side Feeding: Guide your worms to fresh bedding or place them on the side of the finished pile, letting you remove the castings from the other side.
- Upward Migration: You can place the fresh tray above the finished compost so that worms move upward, allowing you to harvest the rich castings below.
2. Light Separation Method
Now, you know worms naturally move away from light.
I leave my compost pile outdoors under the sun. The worms voluntarily migrate downward through the pile, and you can harvest the top layer.
You have to do this every 30 minutes.
3. Screening Method
Separate castings from worms using mesh screens.
For this method, you need a fine mesh or sieve. I have mesh screens with 2-5 mm holes, which are enough to separate finished castings from worms and larger bits.
Start by scooping the compost from the bin and placing it on the screen.
Then gently shake the compost, allowing the castings to fall through the holes while the worms, cocoons, and unprocessed materials stick to the screen.
Keep the casting aside and move your worms and bulky bedding back to the old or new bin.
Final Thoughts
If you want to vermicompost year-round in cold climates, keep the worm bins indoors.
If you have a large backyard, you need multiple worm-hut bins to produce enough castings. The successful vermicomposting includes visible cocoons.
Also, worms are happy, try not to escape, and aren’t balled up in the corner. The casting smells earthy.


Leave a Reply